AutoAD User Guide
AutoAD is an automated trading bot based on the Weighted AD concept. It has been designed with maximum creative functionality and trade condition customization as it’s highest priority. For this reason, it may take some time to learn.
Please read these instructions carefully before asking for help on how to set up your strategy. You should understand the settings fully before putting your hard earned money at risk. The user guide is listed in the same order as the indicator’s settings menu.
Symbols are put into groups
Groups define custom ADs (can be weighted or unweighted)
ADs are then used in trade conditions
Words in bold refer to settings which can be found elsewhere in this guide.
The following settings are not suggestions for trading strategies. The examples use simple conditions to explain the functionality of the indicator as easily as possible.

Weighted AD Type
This setting allows the user to choose between custom built, user defined ADs and preset ADs, such as the Weighted S&P AD.
When Custom has been selected, all groups will defined by the user. When any choice except Custom has been selected, group 1 will be defined by the selection here. For example, if S&P is chosen as the Weighted AD Type, group 1 will be assigned to the 11 S&P subsectors which make it and their weights will be kept up to date automatically.
All preset symbols and weights are kept up to date automatically - do not forget to reload the script in TradingView to update to the latest version. This means you will need to stop and restart your algo to use the latest weights when they update.
When a preset is used, such as S&P or NDX, only group 1 is used in the AD Settings, the other groups cannot be used.
Presets
Custom - User defined
S&P - The eleven subsectors of the S&P
NDX - The 38 most heavily weighted constituents of the NDX
Crypto A - The 12 symbols and weights taken from TradingView’s crypto market dominance page
Crypto B - The same as Crypto A, but excluding USDT, USDC and ‘Others’.


Maximum Daily Trades
Maximum daily trades defines the maximum number of entry trades per day that can be made.
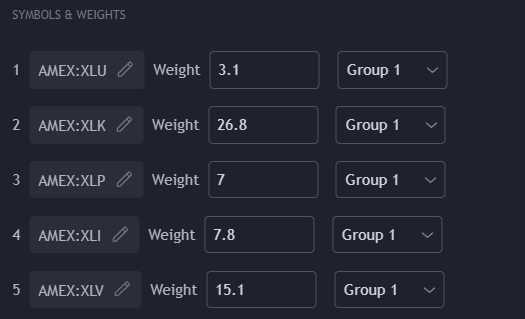
Symbols & Weights
Here, custom ADs can be built when the AD Type has been set to Custom. Each symbol must be assigned a weight. The weight will determine the significance of the effect that this symbol’s price movements have on the group to which it belongs. The combined total of the weights do not need to equal 100. The symbols can be assigned to any group.
Main Reset Time
Main Reset Time is used in:
Maximum Daily Trades to define the beginning of a new day.
Trade Direction
Defines whether the algo will enter into long trades, short trades, or both.
‘Long’ will only allow long trades to be entered and short trade conditions won’t be used.
‘Short’ will only allow short trades to be made and long trade conditions won’t be used.
‘Long (shorts = stops)’ will only allow long entry trades to be made. When short trade conditions (the inverse of the long trade conditions) are met, the strategy will close out of any open long position.
‘Short (longs = stops)’ will only allow short entry trades to be made. When long trade conditions (as they are specified in the setttings) are met, the strategy will close out of any open short position.
Hold Overnight
Defines whether trades, based on their direction, will be closed out before the end of the trading session or held overnight into the next trading session.
Close at
While Hold Overnight is set to None, Long or Short, this time window defines when any open trades which fit this criteria will be closed. New entry trades cannot be made in this window of time. For example, when ‘Long’ is selected in Hold Overnight, any open long trade will be closed on the first candlestick which closes within this window of time.
Restrict Entry Trades
When the box is checked, entry trades can only be made during the window of time set here.
Rollings Lengths
Rolling here refers to the cumulative total of data from an amount of days in the past. Four rolling lengths can be used and are later referred to as ‘Rolling 1’, ‘Rolling 2’ etc. in AD Settings, where they will be explained in more detail.
For example, Rolling 1 is set to 0.5 which means half a day. So, all the data within half a day is included and all data from before half a day ago is excluded.
AD Settings
An AD is time series data, usually visualized as a histogram or line. The following notation refers to the image below.
A - The input data can be from a weighted group, an unweighted group, or the current chart: G1 = Group 1, G2 = Group 2, etc.
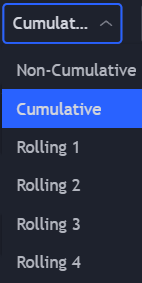
B - The data from the input (A; the group or chart) can be Non-Cumulative, Cumulative, or Rolling. Non-Cumulative means that the AD will always output the performance of the input from the current time unit (candlestick) only. Cumulative will accumulate the non-cumulative data while within the session (C) and will be reset to 0 when the reset time (D) occurs. Rolling will accumulate the non-cumulative data within a window of time and therefore has no reset or session. Consider that both rolling will include extended hours data if used on such a chart, which may be undesirable.
C - The session wherein cumulative ADs can accumulate.
D - The reset time for cumulative ADs. Must be within the session (C).
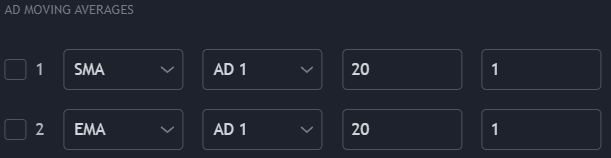
AD Moving Averages
Moving averages can be applied to ADs and can be used in trade conditions.
When the first box is checked, the moving average will be visible. The second box determines the type of moving average. The third box determines the input or source. The fourth box is the length. The fifth box is the multiplier, for example setting this to 1.01 will increase the output of the moving average by 1%.
Bollinger Bands
Bollinger Bands are applied to ADs and can be used in trade conditions. They are later referred to as BB A (Bollinger Band A) and BB B (Bollinger Band B).
AD Based Entry Trade Conditions
ADs and their derivative indicator values can be used in these conditions. All enabled entry conditions, AD based or otherwise, must be met for an entry trade to be made.
All trade conditions are framed in the settings menu for long trades only. Short trades, if enabled above under Trade Direction, will have the greater than and less than signs reversed. Short trades will also subtract instead of adding the number in the last box to the second variable.
For example, in the image below, only one trade condition is used because only the first corresponding box has been checked. The other trade conditions will be ignored. The algo will enter into a long trade when AD 1 is greater than 0+100 (100). The algo will enter into a short trade when AD 1 is less than 0-100 (-100).


When the total weight(s) of a group equal 100, an AD output of 1000 equals roughly 1% of the group it’s assigned to. So, if a cumulative AD is set to a group which is set to ‘Current Chart’ - a 1% move in the current chart (from the open) will result in an indicator output of roughly 1000.
When a middle bollinger band is selected as the second comparator, the middle bollinger band will be used in both long and short trade conditions. When the upper bollinger band is selected, long trades will use the upper bollinger band but short trades will use the lower bollinger band instead.
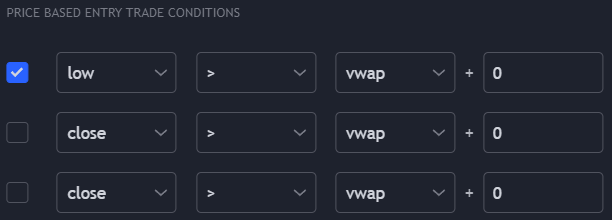


Price Based Entry Trade Conditions
Conditions using the price of the current chart can be made here. Like the AD trade conditions, the condition will only be used if the associated box is checked. Also like the AD trade conditions, for short trades, greater than and less than symbols are reversed and the last box will subtract the number entered from the second comparator instead of adding it. Additionally, low and high will be swapped for short trades.
Day’s Open = Today’s opening price, Yday’s Open = Yesterday’s opening price
Midpoint refers to the halfway point between the high and low of the day.
hlc3 refers to (high+low+close)/3 for the current, most recent candlestick.
When Day’s prefixes an option, such as Day’s hhhl4, this refers to the highest and lowest level of the current day. So in this case, when referring to the current day, it’s (high+high+high+low)/4, or 75% of the distance between the low of the day and the high of the day.
So for example, when both long and short trades are enabled in Trade Direction and no other entry trade conditions are used:
Long trades will be entered when the low of the most recent candlestick closes above the VWAP
Short trades will be entered when the high of the most recent candlestick closes below the VWAP
For short trade conditions, hhl3 will be swapped with hll3. So, a strategy with an entry condition on a long trade which uses hhl3 would also have a short trade entry condition which uses hll3. The same swapping occurs with hhhl4 and hlll4.
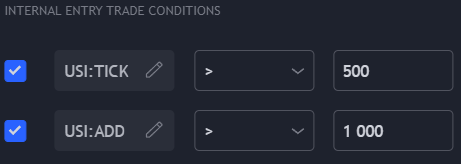
Internal Entry Trade Conditions
Internals can be used here for extra entry trade conditions. The most up to date closeing value is always used in these instances. Although this is designed for internals such as TICK or ADD, any symbol can be used here. In the example below, with no other entry trade conditions in use:
Long trades are entered when the TICK is above 500 and the ADD is above 1000.
Short trades are entered when the TICK is below 500 and the ADD is below 1000.
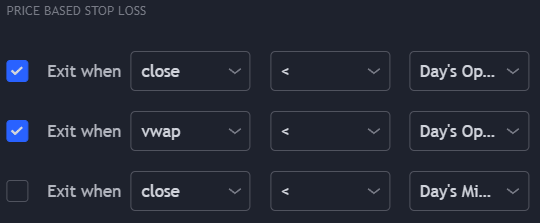
Price Based Stop Loss
Stop losses based on price behaviour are set here. Entry trades cannot be made if stop loss conditions are met, so the inverse of these conditions also act as an additional entry trade condition. The same is true in reverse; stop losses will not be triggered if entry conditions are met. This is to prevent trend following strategies from trading excessively.
In the example below, assuming that entry trade conditions are not met, the strategy will close it’s position when:
The strategy is in an open long position and the close of the most recent candlestick and the VWAP are below the current day’s opening price.
The strategy is in an open short position and the close of the most recent candlestick and the VWAP are above the current day’s opening price.
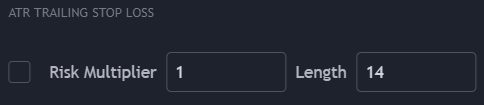
ATR Trailing Stop Loss
Trailing stop losses using ATR can be set here. The length defines the number of candlesticks in the past from which it derives it’s value, which is then multiplied by the risk multiplier. With the left side box checked and a risk multiplier of 2:
Open long positions will be closed when the closing price of the chart’s most recent candlestick is more than 2* the ATR below either the trade entry price or the highest closing price since the trade was entered
Open short positions will be closed when the closing price of the chart’s most recent candlestick is more than 2* the ATR above either the trade entry price or the lowest closing price since the trade was entered
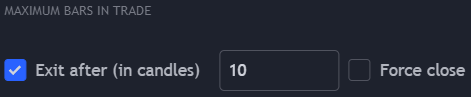
Maximum Bars In Trade
With this setting enabled, trades will exit after the defined number of candlesticks have passed since the trade was entered. This condition will be ignored when entry trade conditions are met unless Force close has been enabled. When an open long trade flips to an open short trade, the candlestick counter will be reset.
Beware - combining Force close with a high number of Maximum Daily Trades may result in dangerous overtrading.